Model List
The primary component of the Model Window is the list of elements. This list is formatted as a table with each element as a row and various information about the element as columns, including the element Name, Category, and Graph (if available for the element). The table can display numerous pieces of information on any element that is a part of an @RISK model.
Please note: when multiple @RISK workbooks are open, the Model Window displays the @RISK elements from every open workbook, and any worksheet that includes an @RISK element. By default, the elements from a given file will be listed under a collapsible header that includes the name of the Excel workbook where that element can be found, as well as a separate collapsible header with the worksheet name.
The Model List columns can be reordered by clicking-and-dragging on a column header and dropping the column in a new location.
Sort the Model List by any column by clicking the column header; subsequent clicks will toggle sorting by ascending or descending values.
Nested Elements
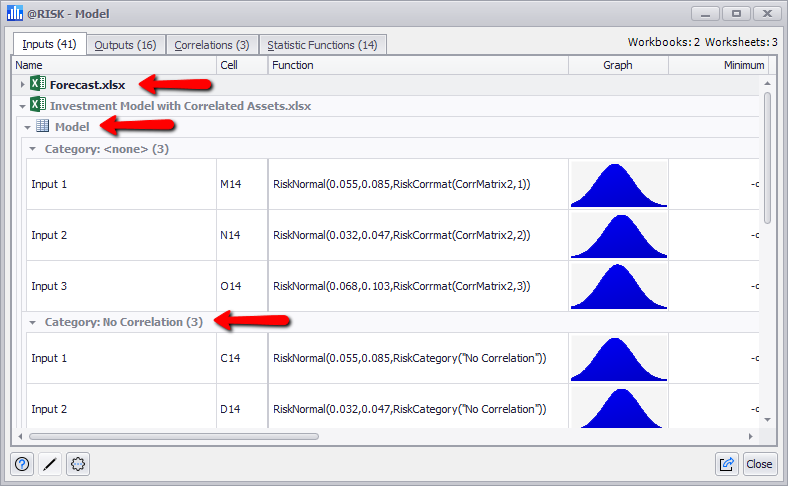
Figure 1 - Model List with Categories
If the Model Window is configured appropriately, the Model List displays elements in a nested structure (Figure 1, right); some examples of this behavior include when viewing the Model list with multiple @RISK workbooks open (Figure 1, right) or when viewing inputs that have been added to specific categories (see Configure Distribution for more information on adding inputs to categories).
When viewing the Model List with multiple workbooks open, and/or when viewing Inputs that have been assigned to categories, elements will only be nested when the options under 'Group Rows By' have been enabled. See Model Command Buttons for more information.
When the Model List displays nested elements, the caret to the left of the containing element can be used to collapse or show the contents of that container (e.g. hide or show inputs within a Category). Each workbook container will be displayed with an Excel icon beside the file name. Each Category will include the number of elements it contains in parentheses to the right of the Category name. Any uncategorized elements will be added to a generic category called '<none>'.
Working with Elements
There are several ways to work with elements listed in the Model List. The two main methods are by right-clicking an element in the list, or by selecting an element and using the Edit Options button in the Model Command Buttons.
To select an element in the Model List, left click any column of the element. Standard keyboard shortcuts also work for selecting multiple elements; Ctrl+click will select multiple, non-contiguous elements and Shift+click will select a range of elements.
Select an element in the list and click the Edit Options button to access tools for working with that element. See Model Edit Options for full details on the options available.
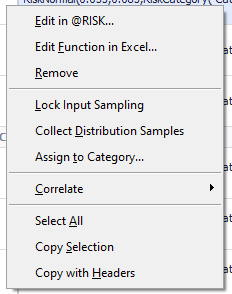
Figure 2 - Model List Context Menu
Right-clicking on an element in the Model List will open a context menu (Figure 2, right) with several options for editing or configuring the selected element, or for selecting or copying multiple elements in the list.
The options available in this list are nearly identical to the options in the Edit Options button (see Model Edit Options for more information), with the exception of the last three options: