Swap-Out and Swap-In @RISK Functions
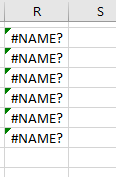
Figure 1 - Function Errors in Excel
An @RISK model contains one or more custom spreadsheet functions, e.g. the functions RiskNormal (an input distribution) and RiskOutput (an output). While these functions are necessary to design a model and run simulations, they can cause difficulties when the spreadsheet is opened on another machine that doesn’t have @RISK installed. In those scenarios, the @RISK functions will all return #NAME? errors (Figure 1, right).
Swap-Out @RISK
The Swap-Out @RISK command allows all the @RISK functions in a spreadsheet to be temporarily replaced (i.e. “swapped-out”) with fixed values. This makes it easy to then share the model spreadsheet with those who do not have @RISK. Others can then view and make changes normally to the spreadsheet in this swapped-out state. Later, the @RISK functions can be restored (i.e. “swapped back in”). @RISK even gracefully handles cases where major changes are made while a model is in the swapped-out state.
Options to also color cells which include @RISK functions, and to include thumbnail graphs and summary reports in a swapped-out model make it possible to share basic @RISK simulation results with non-@RISK users.
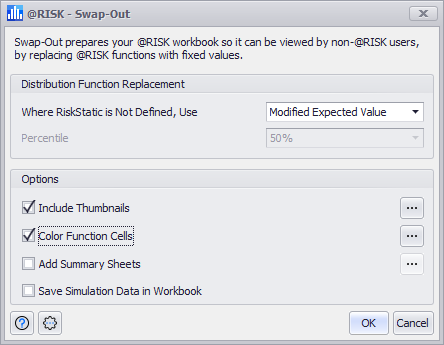
Figure 2 - Swap-Out Window
To swap-out a model, select the Swap-Out @RISK command on the Utilities menu. The Swap-Out window (Figure 2, right) will open, containing the options that control how the swap process functions. The Swap-Out window contains two preference groups:
Distribution Function Replacement
When @RISK functions are removed during a swap out, any cell that contains an @RISK function will have the @RISK function removed and a static value inserted. The options in the Distribution Function Replacement group control what value is used to replace any distribution functions (input distributions or time series models). Additionally, the swap out process will replace other @RISK functions - Outputs, Statistical Functions, and other miscellaneous function - by replacing the function with the calculated value of the cell at the time the swap was performed.
The settings for the Distribution Function Replacement options are identical to the Distribution Returns options in the Simulation Settings window, and they serve the same function in controlling what a cell displays if the @RISK function does not include the RiskStatic property function.
To control the specific values with which @RISK will replace a distribution function, always include a RiskStatic property function in the distribution. The value specified for the RiskStatic function will be used during the swap out process.
The options available are:
-
The "expected value" of a distribution function is its mean; in the rare cases where a distribution function has no mean, the mode will be used.
- Modified Expected Value - Display the modified expected value in the cell; modified expected values are the expected value of the probability distribution rounded to the nearest integer, for use with discrete distribution functions where an integer value may be required.
- Exact Expected Value - Display the exact, unrounded expected value of the probability distribution.
- Mode - Display the mode of the probability distribution.
- Percentile - Display the selected percentile value of the probability distribution.
-
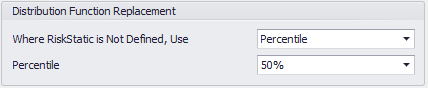
Figure 3 - Percentile Settings
When 'Percentile' is selected from the pull-down menu, the 'Percentile' field (Figure 3, right) will be made active; select a percentile value from the new pull-down menu, or enter a value manually.
Other Options
The Options group settings control what other components are included in the workbook when the swap out process is run. The first three options include additional configurations that can be accessed by clicking the More button (  ). The group contains the following configurations:
Include Thumbnails
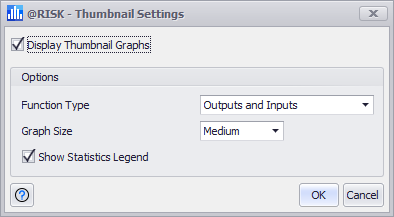
Figure 4 - Thumbnail Settings Window
Thumbnails are small graphs that appear in an Excel comment field; they allow non-@RISK users to see graphs. The Thumbnail Settings window (Figure 4, right) contains additional options for controlling which cells should have thumbnails added, how large the graphs should be, and whether or not to add legends to the graphs.
Please note: if a simulation has been run before the swap out process, the thumbnail graphs will display the results of the simulation. If no simulation has been run, the graphs will display graphs of the theoretical results of the element.
Color Function Cells
This option causes the cells that contain @RISK functions to be colored, based on their contents, as part of the swap-out procedure. The specific colors used, and how those colors should be applied to the spreadsheet can be controlled from the Color Cells Preference window.
The Color Function Cells options use the same settings as those specified in the Color Cells Preferences window of the Preferences menu. See that topic for more information on these options.
Add Summary Sheets
By adding a summary sheets to a model, additional worksheets are added to the swapped-out model; these sheets contain additional information about the model and any simulation results that have been generated.
If simulation results are available when the swap out is performed, the summary sheets will contain information about the simulation that was run, corresponding closely to what is contained in the Results Summary window. If a simulation has not been run before the swap out is performed, the summary sheets will contain information more closely aligned to what is shown in the Model Window.
Save Simulation Data in Workbook
This option causes @RISK to embed the last run simulation results directly in the swapped-out workbook. These results are not useful to non-@RISK users who are viewing or editing the model, but it may be desirable to keep the data for later, when the model is swapped back in. See Swap-In @RISK for more information.
Swap-In @RISK
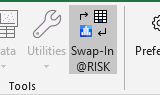
Figure 5 - Swap-In @RISK Button
After a model has been swapped out and all the @RISK functions removed, most of the @RISK ribbon will be disabled and new @RISK functions cannot be added to the spreadsheet. However, a new icon will appear on the ribbon that allows the functions to be swapped back into the model (Figure 5, right).
The Swap-In @RISK command opens the Swap-In window (Figure 6, below), which controls how @RISK will report changes that will be made to the spreadsheet prior to inserting @RISK functions back in; this allows changes to be reviewed and edited before they are applied. In most cases, the Swap-In procedure can be considered to be automatic, as @RISK captures all changes to static values that were made when functions were swapped out. It also handles moved formulas and inserted rows and columns automatically. However, if formulas or static values where @RISK functions were previously located are changed or deleted in a swapped-out model, previewing those changes can be beneficial. Thus, the default option for the Swap-In dialog is to only preview cells that have had either their static value or formulas changed while swapped-out.
To enable tracking of all changes made to a swapped out model, @RISK will create a hidden worksheet in the Excel workbook. This sheet - titled RiskSwappedFuncs - should NOT BE REMOVED.
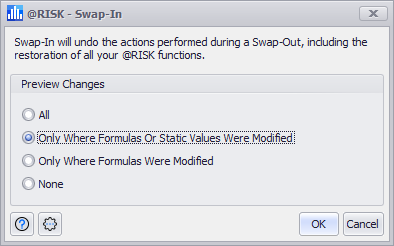
Figure 6 - Swap-In Window
The options available in the Swap-In window are:
When 'OK' is clicked, the swap in process will open the Review Model Changes window (see below), if appropriate.
A few examples of how the swap-in preview works:
Example 1: A change in a static value
Suppose the original @RISK distribution in cell C10 was:
=RiskNormal(990,100,RiskStatic(1000))
After swapping-out, the formula for the cell becomes:
=1000 (the value for the RiskStatic property function, above)
Next, suppose the value in cell C10 was changed, while functions were swapped-out to be:
=2000
@RISK will swap the following function back in, updating the static value (the argument passed to the RiskStatic property function):
=RiskNormal(990,100,RiskStatic(2000))
It might be desirable to preview this change before accepting it.
Example 2: A change in formula
Suppose the original @RISK distribution in cell C10 was in the formula:
=1.12+RiskNormal(990,100,RiskStatic(1000))
After swapping-out, the formula would be
=1.12+1000 (the leading value AND the value for the RiskStatic property function)
Next, suppose the formula in cell C10 was changed when functions were swapped out:
=1000
@RISK will swap the following function back in, changing both the original RiskStatic parameter value and the overall formula:
=RiskNormal(990,100,RiskStatic(1000))
It might be desirable to preview this change before accepting it.
Review Model Changes
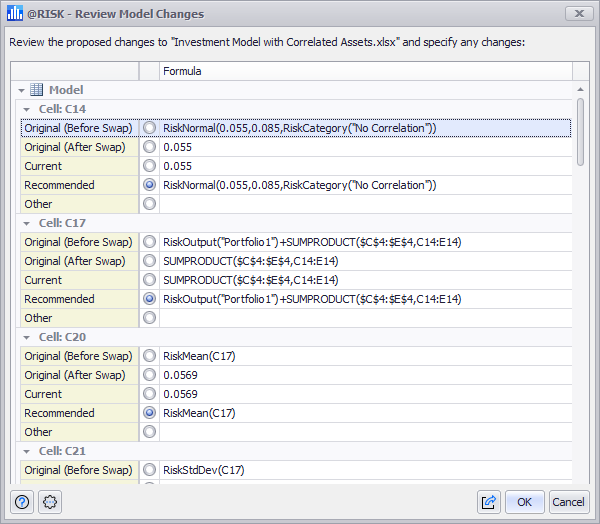
Figure 7 - Review Model Changes Window
Any previewed changes will show up in the Review Model Changes window (Figure 7, right). This window is organized as nested elements with individual cells listed under their worksheet, and worksheets listed under their workbook. It lists each of the cells in the workbook that will be modified by the swap-in process and for each item, there is a choice of four possible functions to swap back in (in some cases, two or more of these functions may be the same).
The options available are:
Review Model Changes Command Buttons
The Review Model Changes window includes command buttons that allow for bulk application of actions, as well as exporting the model change information:
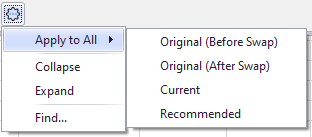
Figure 8 - Review Model Changes Tools Menu
-
 Help - Open help resources (online or local, based on @RISK settings); see Help Button for more information.
 -
 Settings/Actions - Window-specific settings and actions. The Review Model Changes options are:
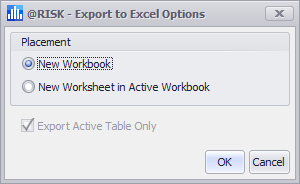
Figure 9 - Export to Excel Options Window
-
 Export - Commands for exporting the current table of data. The options available are: