Parameter Settings

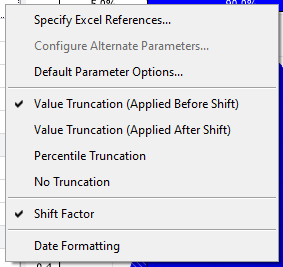
Figure 1 - Parameters Menu
Several options for a distribution's parameters can be set through the Parameters menu (Figure 1, right). This includes which type of parameters to use (Standard or Alternate), truncation limits, shift factors, and date formatting for time-based distributions.
Specify Excel References - Parameter values can reference the contents of Excel cells - including static values, formulas, and even other @RISK distributions.
Using the Specify Excel References option gives the same result as manually entering a cell reference or formula in the parameter values (Figure 2, right).

Figure 2 - Cell References in Parameters
After clicking Specify Excel References, click and drag to select contiguous cells; when selecting contiguous cells, the first cell selected will be used for the distribution's first parameter, the second cell selected will be used for the second parameter, and so on.
To select non-contiguous cells, hold down the CTRL key while clicking; similar to selecting contiguous cells, the first cell selected will be used for the first parameter, the second cell will be used for the second parameter, and so on.
Configure Alternate Parameters - Many distributions can utilize an alternate set of parameters; for example, a Normal distribution uses a mean and standard deviation as the standard parameters, but can use percentile values for the left and right thresholds instead. See Alternate Parameters for more information.
Not all distributions have alternate parameter options.
Additionally, all distributions that can utilize alternate parameters are listed under the Alt. Parameter and Alt. Parameter (D) categories in the Select Distribution window (as well as ending in 'Alt' or 'AltD'). Selecting the 'Alt' or 'AltD' version of a distribution will automatically set the Parameters options appropriately in the Define Distribution window.
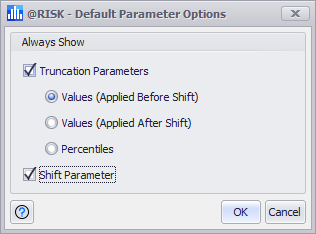
Default Parameter Options - The options to always display Truncation Parameters and Shift Parameters (see below) can be set in the Default Parameter Options window (Figure 3, right). When selecting to always display Truncation Parameters, Values (Applied Before Shift), Values (Applied After Shift), or Percentiles can be selected.

Figure 3 - Default Parameter Options
The options to always show Truncation and Shift parameters are set at the application level, not for an individual distribution, worksheet, or workbook; these settings will persist between workbooks and will remain until changed.
Not every distribution or every scenario is appropriate for the use of Truncation or Shift Factors, and setting these parameters can have significant impact on the results of a simulation. See Truncation Settings and Shift Factor Settings for more information.
Value Truncation (Applied Before Shift) - Use truncation to exclude upper or lower value ranges (e.g. all values less than or equal to 1) from the distribution and apply truncation before a shift is applied. SeeTruncation Settings for more information.
Value Truncation (Applied After Shift) - Use truncation to exclude upper or lower value ranges (e.g. all values less than or equal to 1) from the distribution and apply truncation after a shift is applied. SeeTruncation Settings for more information.
Percentile Truncation - Similar to Value Truncation, a distribution can have upper and lower percentile ranges excluded from the overall distribution. See Truncation Settings for more information.
Shift Factor -Shift Factors can be added to a distribution using this parameter; a shift factor will move the distribution's location by the value provided. See Shift Factor Settings for more information.
Date Formatting - By default all parameters, both standard and alternate, utilize rational number values for the range of possible outcomes. However, distributions may be configured to use dates for the range of outcomes; selecting Date Formatting may add or update the Shift Factor parameter to specify the starting date for the distribution.