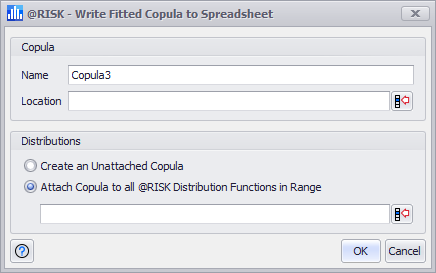
Write to Excel

Figure 1 - Write Fitted Copula to Excel Window
Writing a fitted copula to a spreadsheet is the final step in the fitting process; clicking the 'Write to Excel' button will open the Write Fitted Copula to Excel window (Figure 1, right).
To use a fitted copula in an @RISK model, give the Copula a Name and select a location for the copula data.
Select how the copula data should be written under'Distributions'; see below for information on unattached and attached copulas.
The Write to Excel window has two sections, each detailed below.
Copula
Each copula in a model must have a unique name. Adding a copula to input distributions adds the RiskCopula property function to the @RISK distribution function and the value of the Name field will be used in the property function. For example, the following input:

Figure 2 - Copula Data
Lastly, a location must be selected to write the copula configuration data (Figure 2, right). Enter a cell reference or use the Select Cell button to configure where @RISK will write the copula data.
Distributions
Copulas can be created either attached to existing input distributions, or as unattached copulas to which input distributions can be attached manually. When writing a copula to Excel, select whether or not the copula should be attached in the Distributions section.