Table Settings
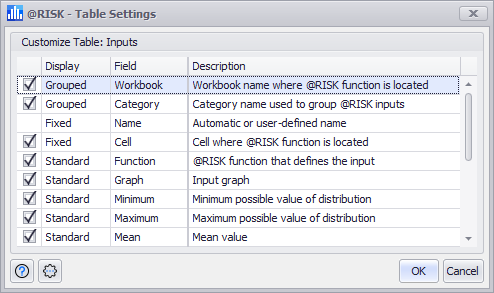
Figure 1 - Table Settings Window
The Table Settings window configures the appearance of a table, including how containing elements (e.g. worksheets or categories) are displayed and which columns are visible in the table. In addition to the visibility toggle and Display settings, the Table Settings window includes the name and a brief description of all fields that are currently available in the table.
Please note, the fields listed in Table Settings will change based on the @RISK models that are currently open. For example, if only a single @RISK model is open and that model only has @RISK elements on one worksheet, the 'Workbook' and 'Worksheet' fields will not be displayed.
It may be necessary to scroll down to view all fields available for configuration.
To open the Table Settings window, click the Tools command button and select 'Table Settings'.
To add or remove a field from display in the table being configured, check or uncheck the box in the first column.
To change how an item will display, click the value in the Display column for that field (e.g. 'Grouped' or 'Fixed'). The field will display a pull-down menu with the available options for that field. See Display Settings below for details.
Display Settings
The Display pull-down menu has four options for how a particular field should be displayed in the table; not all options are available for all fields. The options are:
Command Buttons
The Table Setting window includes its own Settings/Actions command button with the following options: