Truncation Settings
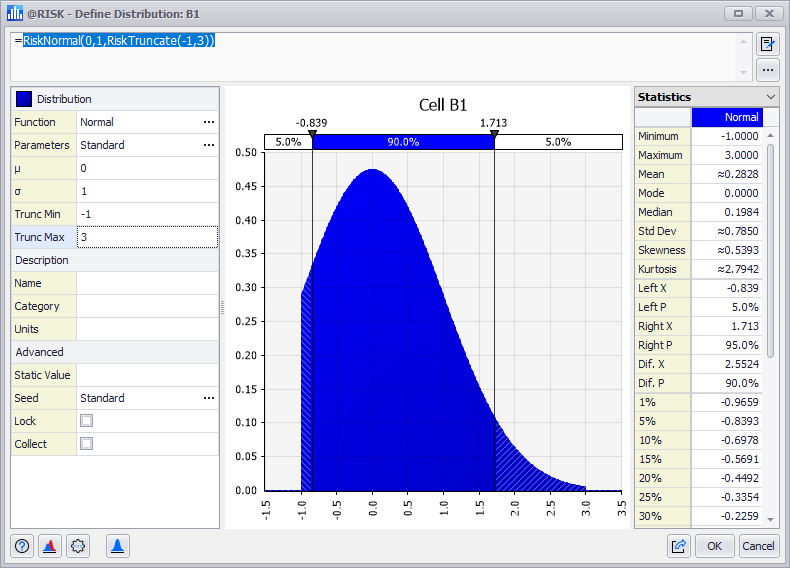
Figure 1 - A Truncated Discrete Distribution
Adding truncation limits to a distribution restricts the possible values it will return. For example, the Normal distribution in Figure 1 (right) has been trucated to return values limited to be between -1 and 3. The distribution curve demonstrates this truncation visually by ending at -1 and 3 on the graph.
In the Define Distribution Window, truncation is enabled from the Parameters drop-down menu (Figure 2, below).
There are three ways to specify a truncation - two methods using values and a third method using percentiles. Each option corresponds to a different @RISK property function inserted in the distribution function.
When using value truncation along with a Shift Factor, a decision needs to be made whether to truncate before or after the shift. Each method will result in a different outcome (see examples, below).
The three methods are:
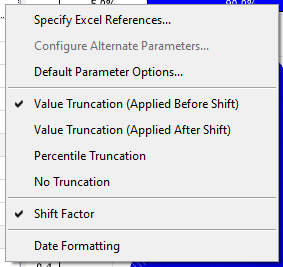
Figure 2 - Parameter Settings Menu
After choosing one of the three truncation options, two additional fields will be shown in the Configuration Panel for the distribution. These fields specify the truncation limits.
Note: It is not necessary to enter values for both the minimum and maximum limits. To truncate only the left side of the distribution, specify only a minimum and leave maximum blank; likewise to only truncate the maximum, leave the minimum value blank and only enter a maximum.
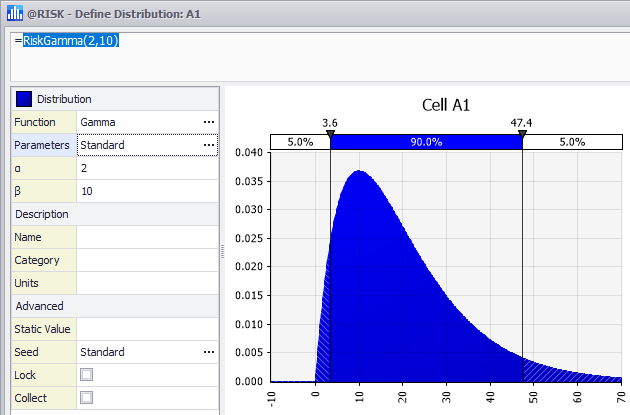
Figure 3 - Distribution - No Truncation or Shift
When specifying truncation and shift together, careful consideration needs to be given to whether the truncation occurs before or after the shift. For example, consider a RiskGamma(2,10) distribution with a minimum truncation of 5 and a shift of 3, but with the truncation applied two different ways (Figure 3, 4 and 5, right). Figure 3 demonstrates the distribution function without truncation or shift.

Figure 4 - Distribution - Truncate Before Shift
The first method - Figure 4 - applies the truncation before the shift. The lowest value of the distribution is 8 - the minimum truncation of 5 is applied and then it is shifted right.
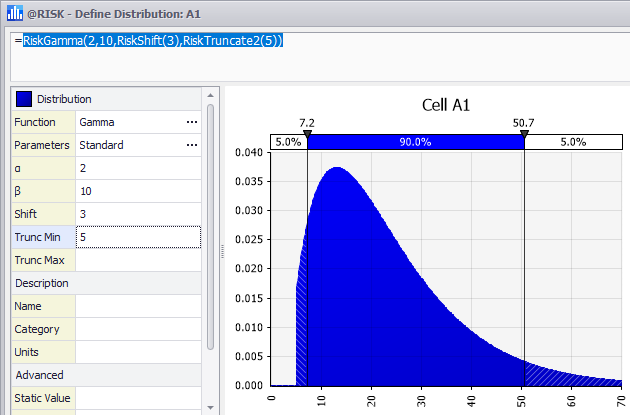
Figure 5 - Distribution - Truncate After Shift
The second method - Figure 5 - applies the truncation after the shift. The lowest value of the distribution is 5 - the distribution is shifted right and then truncated at 5.
Please note: The RiskTruncate2 function (truncate after shift) is new to @RISK 8.0 and does not exist, and will not be supported, in earlier versions of @RISK. Use of this function will result in errors if the workbook is shared with another user who has an older version of @RISK!